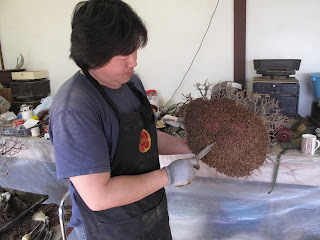
I will be posting a lot about that trip (or at least I plan to at this point) because a lot has happened on that trip. But the first thing I want to post is the list of 23 steps to repotting that I learned. here they are:
Repotting steps:
1. Record the angle of the tree and orientation
2. Cut the wires at the bottom of the pot
3. Cut the tree out of the pot – sickle and hook.
4. Lift the tree out.
5. Lean the tree to the left and work the bottom of the tree with a rake until hit hard wood. If there are medium roots growing under the trunk cut those off (root cutter)
6. Cut the roots so that the bottom is flat (scissors)
7. When the bottom of tree is flat work the top of the root ball with a hook or bent nose tweezers
8. Remove the moss from trunks and comb out the roots
9. Cut the perimeter of the root ball so that it is one smooth line (oval or circular depending on the shape of the trunk)
10. Fluff the roots one more time and cut them from the top so that there is one continuous down sloping line at the top of the root ball. If there are high roots or small feeder roots growing on the top of the nebari cut those off
11. Put screens in the pot, wire, and find the front of the pot. When putting in the tie down wire pre-bend the wires before putting them in. the length of the wire should be two long sides and one short side.
12. Put drainage layer and some soil in the pot and position the tree
13. Check the soil level by aligning the front rim and the back rim – the tree should be slightly (quarter inch or so) above the desired height)
14. Offset the tree to depending on the direction of the trunk – if the tree is leaning left offset it to the right
15. Check the side angle – the middle of the tree should line up with the middle of the pot from the side
16. When the tree is aligned work it into the soil so that the soil level is where it is supposed to be
17. When the tree is positioned start tying the tree in. figure out where you want the last tie to be based on the hard root to tie against. If it is on the left side start from front left in counter clockwise direction.
18. Hold the trunk of the tree and pull on the front tie to tighten it and hand tie it to front right.
19. Cut off the extra wire and make the fifth tie (can be done before tying the first tie)
20. When the three hand ties are done start the last tie by hand. Pull on the wire with pliers, then press the wire down with fingers of left hand, relax right hand and close the space by tightening the wire with pliers. Pull the tie again, press with fingers and close the space by turning the tie with pliers
21. Add a little of soil around the root ball and work the soil in with a chopstick. Tap the pot, while holding the trunk, to let the soil settle.
22. Fill the pot to the rim line with soil
23. Water the tree.
24. Apply sphagnum moss (mainly for deciduous)
25. Enjoy the newly repotted tree with a cold beverage!
And this does not include that trick with a string a a weight you can see this video look at 38:00 mark (and notice Kawabe helping).
Here is a few trees I got to repot:


Oh, yeah, this tree was displayed in Kokufu a few years back.


No comments:
Post a Comment