Sunday, July 10, 2016
Bonsai as a hobby
I often find myself stressed about bonsai. I might be in the minority, but there could be others out there who feel the same way. I decided to put down my thoughts about how I tried to decrease the stress of bonsai and increase the enjoyment of it.
1. Making mistakes
I used to be much more concerned about making a mistake and because of it I would not do things, being worried about doing the wrong thing. At some point I realized that doing bonsai means making mistakes, but, hopefully, fewer mistakes each year. Luckily, as long as those mistakes don’t kill your tree, the tree will help you correct the mistake in the future. Compassion goes a long way, and I really had to work on having compassion towards myself.
2. Having too many or too few trees
When starting in bonsai I did not feel like I should buy many trees before I got my skill to a certain level. As a result I had few trees and practiced too many procedures on those few trees. Doing too much to a tree will slow it down, so the collection did not progress well. Then I went in the opposite direction and accumulated more trees than I could take care off and again some of the trees did not get enough attention. However, I do think that having too many trees is better than too few because … you can always give away a few. I am lucky to have friends around who can benefit from a couple of “hand me down” trees. When I look at my trees I think that maybe half of my collection I got for free from other club members.
3. Finding the time
This one I still struggle with the most. Bonsai is way more time consuming than I think, particularly, when I am trying to do a good job . I often feel rushed despite the fact that I have the most understanding and accommodating family. So here are the ways I found useful in managing the time. First, I need to communicate to myself and the family about how much time I plan to be working in one session (usually it is two hours). Then, I plan what I want to accomplish and try to cut it in half. If it is repotting, I hope to just do one tree in those two hours, and when I am done I try to re-evaluate and see if I have enough time to do another project. I always try to remember to leave time for cleaning, but I don’t always have the time to clean . Some jobs can be left for a few hours and be finished later. In fact almost all jobs can be finished an hour later. In Japan when lunch is served the work stops (trees that are out of pots during repotting sessions just get buried in the soil).
Another balance I struggle with is spending time on my trees vs. spending time with the club. I often feel guilty about any amount of time I spend on club related activities, because there is always more bonsai work that can be done. But I try to remind myself that without a club I would not be doing bonsai so I think of it as breaks from bonsai work and just fun. But I do try to be protective of the time I spend on the club, because there is always more one could do.
4. Regret of missing out on work
This one is one of the constant feelings I get. I should have repotted this tree or grafted this tree. I should have done this differently or I should have found the time to do that earlier. What I learned is that there is always next year so and there is never enough time so it is important to prioritize. All this starts with a list or a plan: what has to be done to keep trees healthy. what needs to be done to get best trees progressing, what would be nice to have accomplished.
5. Trees dying
Yet another thing I had to learn to be ok with is that trees sometimes die. Sometimes I know why that happened and sometimes I don’t. Trees dying is part of bonsai. It happens to all of us, even pros. There is an expression I learned in Japan – Shoganai. It literally means “it could not have been changed” but I prefer the more common expression “shit happens”. Amazingly, the one tree that started this adventure is still alive, but it is a bougainvillea and those are hard to kill
6. Having a vision for the collection
Having a vision for the collection is something I am not certain about, but I think it is important. This is something I am working on. I used to buy trees on a whim, when there was an opportunity or I just could not resist doing it. Now I have somewhere around 50 trees, and I think I need to start thinking about where I would like to be in a few years. I refer to work on just a few species – maples and pines, for now, but at some point I realized that many of my trees have the same feel so I started to think about how the trees would fit together. Another big part of it is how the trees are displayed in your garden. I am still not clear on this, but this is something that I am thinking more and more about.
7. Taking pictures
Probably the most important thing for long term enjoyment of bonsai is taking pictures. There are many reasons for it. Pictures help you document the progression of trees. It is very easy to forget how things were just a few years ago. Whenever you get a tree to a point where it has progressed to a certain point it is good to know how far you have come. The trick is to remember to do it and cell phone camera makes things easier because pictures get automatically saved and are easy to find. I try to keep a folder for each of the best trees where I can document the progress.
8. Travel. A lot. Not only to Japan.
Travel is super important part of bonsai for me for a couple of reasons. First, that’s how I learned most, by traveling to Japan and starting to learn at Aichi-en first with Peter Tea and then with Juan Andrade, both were apprentices in Japan. But also traveling to see Peter in CA when he got back – I learned a lot from spending a few days a year with Peter. I am hoping to continue to travel to visit people. I got to pick up some material and pots in my trips as well. But the most important reason is that you get to meet amazing people and get a different perspective on bonsai. I have not done enough traveling to shows, but that would be something I would like to start doing a little more of. I am hoping to go to Taikan-ten this fall.
9. Hire professionals.
I don’t think there another way to learn that is better than hiring good professional bonsai artists to work on your trees. Figuring out who you are most comfortable with might take a little time but when you find that person or persons try to develop a relationship with them. This is what makes bonsai fun – relationships. This is true for both bonsai artists as well as potters. There are some amazing potters now in the west and we as hobbyists can do a lot to support and encourage them and it is easy too – buy more pots!

Tuesday, July 5, 2016
Virginia Pine
This blog post will be about one of my favorite trees – It is a Virginia Pine I collected in 2012. Rodney Clemons was kind enough to pot it for me in the box and it spent two years getting strong.

I really liked the bark and the shari on this tree.

Then I repotted it into a bonsai pot in 2014. I had to remove a significant part of a large root on the left side of the tree. The tree grew strongly after being repotted.

In August 2014 Juan Andrade did the initial styling. We decided to do an approach graft on the right side of the tree – you can see the branch attached with plastic tape where it is going to be grafted next spring. This branch is coming from the top (second from the top on the right side). I grafted this branch in Spring 2015.

In May 2015 the tree was growing very strong and the candles were getting ready to be cut.


In July 2015 I cut the candles on this tree for the first time. I also pulled needles earlier in the spring to balance the strength. I think that Virginia pines are as strong as Japanese Black pines and can be decandled every year if strong.
This year the tree is looking very strong and the candles are just as strong as last year. We will see how well it responds next year to getting candles cut two years in a row.
In June 2016 Juan visited me again and we decided that we are going to make it a shorter tree with the apex coming from the branch on the top right after I separate the approach graft. We also cut the candles for the second year in a row.

The graft is almost ready to be separated, but I want to take it slow because it is a very important branch.

And two weeks after cutting candles I got new buds pushing already!
This tree is one of 4 Virginia pines I have. I like Virginia pines for a number of reasons. Frist, they are native to southern US and are strong. The stronger the species the faster it can be developed. Second, since they are native they are relatively easy to find and collect. Third, while the needle quality is not as fine as Japanese black pines it is can be refined through mekiri. And, most importantly, they develop a very nice bark!
I will be posting an update on the first Virginia pine I collected and styled – here is the link to the initial bends. Stay tuned.

I really liked the bark and the shari on this tree.

Then I repotted it into a bonsai pot in 2014. I had to remove a significant part of a large root on the left side of the tree. The tree grew strongly after being repotted.

In August 2014 Juan Andrade did the initial styling. We decided to do an approach graft on the right side of the tree – you can see the branch attached with plastic tape where it is going to be grafted next spring. This branch is coming from the top (second from the top on the right side). I grafted this branch in Spring 2015.

In May 2015 the tree was growing very strong and the candles were getting ready to be cut.


In July 2015 I cut the candles on this tree for the first time. I also pulled needles earlier in the spring to balance the strength. I think that Virginia pines are as strong as Japanese Black pines and can be decandled every year if strong.
This year the tree is looking very strong and the candles are just as strong as last year. We will see how well it responds next year to getting candles cut two years in a row.
In June 2016 Juan visited me again and we decided that we are going to make it a shorter tree with the apex coming from the branch on the top right after I separate the approach graft. We also cut the candles for the second year in a row.


The graft is almost ready to be separated, but I want to take it slow because it is a very important branch.

And two weeks after cutting candles I got new buds pushing already!

This tree is one of 4 Virginia pines I have. I like Virginia pines for a number of reasons. Frist, they are native to southern US and are strong. The stronger the species the faster it can be developed. Second, since they are native they are relatively easy to find and collect. Third, while the needle quality is not as fine as Japanese black pines it is can be refined through mekiri. And, most importantly, they develop a very nice bark!
I will be posting an update on the first Virginia pine I collected and styled – here is the link to the initial bends. Stay tuned.
Friday, May 27, 2016
To automate or water by hand
Last year I installed an automatic watering system and I was thinking about doing the same thing this year, but then I decided to water by hand instead. There are many reasons and many lessons I learned from going through the process and I will try to outline those here.
The main reason I decided to install a watering system last year was because I was working in Autsin for five weeks and I did not think it would be feasible to find people to water for me for all those times (but I will have to do something similar this year). Five weeks in Austin and other usual summer trips meant asking for a lot of help. So I did some research and decided on a soaker hose based system with a four zone timer.
In case other people are considering whether watering system is worth your effort here are my impressions.
What I did not like:
1) Concerns about failure – this was the biggest problem. My system failed three times at different points. Twice I came home with water running down the street because connectors failed (once before the timer so it could be going for a while). Once the goof plug at the end of the line came out and the water was coming out of the end of the soaker hose instead of the sides and messing up the pressure on the whole bench. What’s worse is that knowing that failures have occurred kept me worried about whether it is going to happen again. It definitely took the pleasure out of the automation. And after all that my timer failed – I checked it in the morning and everything looked fine but when I got home in late afternoon the trees were super dry. The batteries were fine, the program was correct, but I am certain they did not get watered and it was a hot day. I pulled the batteries out and put same batteries back after I checked them and it worked well the next day. I tried figuring out what happened but it remains a mystery.
2) Less control – you definitely don’t have the control you would have with hand watering. Being able to adjust the amount of water to differences in temperature, moisture, rainfall, types of trees, stages of development (e.g. did you just de-candle the tree) makes it less optimal. Some of those issues can be adjusted, but I don’t think it can be adjusted to the point that you can get to with hand watering.
3) Not being able to move the trees easily – because I would attach the soaker hoses with wire hooks to the soil it became easy to move the trees as well as rotate trees. This is not a big problem, but it definitely diminished my ability to work on trees easily.
4) Less contact with the trees – not watering every day, or twice a day, made it easier to ignore trees. I did not get to look at my trees every day and so some things were ignored. It would make it harder to spot problems early.
5) Uses way more water than hand watering – I noted that my water bill was higher than usual and more water was ending up on the ground instead of the pots. I think the soaker based system uses less water than sprayer systems, but it is still more than hand watering, in my opinion.
6) Difficulty with fertilizing – I fertilize using tea bags and I constantly struggled with placement of hoses over the bags, around the bags, under the bags, etc. Somehow, I could not quite figure it out so that the pots with bags would get watered evenly and enough water would go through the bags.
What I liked:
1) Not having to ask for favors and rely on others – this was the main reason I installed the system. I still had to ask people to check that it has not failed but I did not have to find people to water twice daily.
2) Flexibility with schedules when at home – when I hand water I have to be home at certain times, but the system freed me from it. I could water by hand in the morning and set a timer to water in the afternoon only.
So my advice is to not use the automated system if you can do the watering on your own or with a little help from your friends.
Tuesday, March 15, 2016
A big airlayer that (almost) worked
A year ago I decided to deal with the ugly roots and an obvious graft line on a large maple.
 So after considering it for a few years I decided to airlayer it above the graft line. As often is the case, Carrie and I did it together.
I have been pretty successful with airlayers, as in all live, but some don't get 360 roots, but I have never done one on a trunk over two inches. One of the problems of doing it at the same time from both sides is that sometimes the lines don't meet.

A year later we decided to look inside the big pot and see what we got.

Well, what we got was wonderful roots

But only on one side. Turns out it is important to rotate your airlayers, even if the tree is over 50 pounds and is hard to deal with.

After some wrestling with separating this thing without cutting the roots off I came up with the idea of wrapping the roots in a t-shirt and sawing through the stump. It took some time.

I was pretty sure there were enough roots there for the tree to survive. I recut the side with no roots and added more rooting hormone with the hope of better luck next year. I guess I don't need to rotate it anymore :)
The tree seems to be doing well a month later. I hope it growth new roots this year.

Thursday, March 3, 2016
Progress on a large Virginia Pine
This pine was collected in February 2013 and potted up with Russell Baggett in a box that he built for me. I think it was about 3 feet by 13 inches by 10 inches. The tree was growing on top of a crack on a rock and was really easy to lift out, but came with a long rootball.


The top two pictures are from August 2013 and March 2014. It spent about a year and a half in the box growing undisturbed with minimal pruning until...
The big bend!
In August 2014, Juan Andrade stopped by and we bent the pine in the section that was almost 2 inches thick. It took some preparation and I had a acquire a few tools, like the large jack, stainless wire, a steel rod. My band saw came in handy to cut a notch in the 2x4.


This is what it looked like before we started cranking.
 After about a 30 degree bend the copper wire we were pulling with (#10) broke!

So we switched to stainless steel wire, but we did not want to take any more chances and use 10 loops of it. An overkill for sure.


At the end it was about a 90 degree bend. We stopped every few cranks on the jack and checked that the rig was ok and gave the tree a chance to adjust.
 And then we pruned it. A lot.
 I took the wire and the plastic rope off in September 2015, a year after we bent the trunk. I put a screw into the trunk and tied the top to the screw with stainless steel wire so that when I cut the pulling wires the tree did not spring back.


Then at the end of February 2016 my friend Carrie and I repotted the pine into a smaller (20x14x6) box. We worked just one side of the rootball and removed a big root. My plan is to start grafting it next year and repot again in two years working the other side of the root ball.
After then I can start working on the upper part of the tree. This is a long term project, but with collected material they are all long term.
PS. right after posting this story I got a Facebook reminder of the picture I posted on FB three years ago - and it this pine.


The top two pictures are from August 2013 and March 2014. It spent about a year and a half in the box growing undisturbed with minimal pruning until...
The big bend!
In August 2014, Juan Andrade stopped by and we bent the pine in the section that was almost 2 inches thick. It took some preparation and I had a acquire a few tools, like the large jack, stainless wire, a steel rod. My band saw came in handy to cut a notch in the 2x4.


This is what it looked like before we started cranking.


So we switched to stainless steel wire, but we did not want to take any more chances and use 10 loops of it. An overkill for sure.


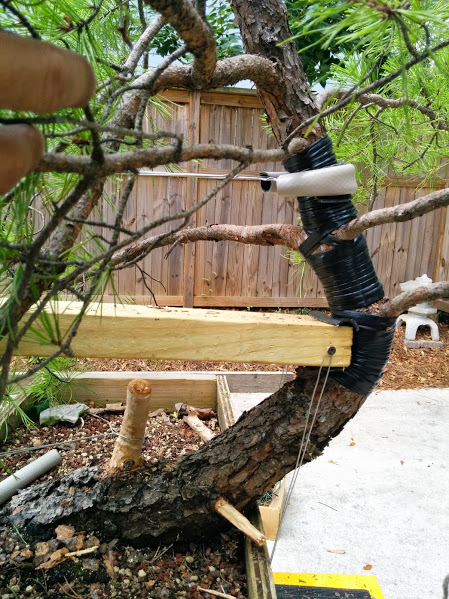
At the end it was about a 90 degree bend. We stopped every few cranks on the jack and checked that the rig was ok and gave the tree a chance to adjust.


Then at the end of February 2016 my friend Carrie and I repotted the pine into a smaller (20x14x6) box. We worked just one side of the rootball and removed a big root. My plan is to start grafting it next year and repot again in two years working the other side of the root ball.
After then I can start working on the upper part of the tree. This is a long term project, but with collected material they are all long term.
PS. right after posting this story I got a Facebook reminder of the picture I posted on FB three years ago - and it this pine.

Sunday, March 29, 2015
First Show
This year I decided to put a tree in the show. My friend, Russell Baggett, has been telling me for about a year or two that I should stop worrying that my trees are not ready and just put them in the show. It is not about winning - it is about supporting the club. So this year I figured I need to go ahead and do it. While pines are what I am most attracted to in bonsai I decided to display a Juniper Foemina I bought from Rodney Clemons back in 2011. Junipers grow much faster and so I thought of all my trees this one had the most potential to look ok for the show. I also had to get a stand and I ordered one from Jerry Braswell. I talked to him and gave him the specifications for the stand I wanted and he did a great job.
Below I posted the progression of this tree from October 2011 until March 2015.

This is the first picture I have from October 2011. The tree was very full when I saw it, but I did not take a picture and started to cut it and apply wire. In fact, I think this is the first tree I have ever wired. The next picture is from the same month.

This was my first time working on juniper foemina and I remember that after a few hours I noticed that my hands started to tingle from all the pricks. Those needles are pretty sharp and you need to be careful not to push against the needles, but to handle the foliage with the flow of the needles.

A few months after I wired the tree Ryan Neil came to visit our club and I brought the tree to his workshop. He had adjusted the angles of some of the branches and had me add heavier wire for main branches. Next is the picture from December 2011 after Ryan has set the branches.
 December 2011.
 February 2012 - I just repotted the tree into better bonsai soil. I think this is when I started to take pictures of my trees once a year. This is a really good practice and I recommend that to anyone I know. I also try to take pictures of trees when I work on them. Life is so much better with automatic backup :)
 February 2013 - I think I did not do much but just fed the tree and let it fill out. The only thing I did is add a shari on the trunk - the trunk line looked a little too simple and boring and I thought a shari could help it.
 May 2013. Our annual show used to be in May and in 2013 our judge was Boon. He suggested cutting off the first branch and making jin which transitioned into the second shari. The tree got fuller yet and Boon also talked to me about cutting a tree for better structure.
 March 2014. Another shot from the annual photo shoot. I repotted the tree into Zenigo pot which I thought was a better fit for the tree, but still left enough space for the tree to grow and develop.
 August 2014. One of the benefits of living in Atlanta is that it makes it easier for friends to stop by. Juan Andrade was flying back to his bonsai apprenticeship in Aichi-en in Nagoya from a trip home and he stopped by for a few days. We were joking about how it is so hot and he noticed my sombrero (a present from Russell Baggett). I posted this picture on Facebook with a title the Juan suggested - "Ay chihuahua, que calor!". When I showed it to my wife, without missing a beat she said "From Aichi-en to Ay Chihuahua!" This photo ended up in the article about Juan in Bonsai Focus.
 February 2015. I finally got my stand. I think this is when I first thought that now I can actually display a tree in a show and I had to start getting it ready.
 At this point I think I just cleaned it and wired a couple of branches. It was still pretty cold in February so I was doing most of the work inside. One day Maya, my 7 year old daughter, got a needle embedded in her foot - it took a long time just to convince her to let me get it out. Sorry, Maya. This is one of the stones I considered displaying the tree with.
 When it warmed up for I took the tree outside to clean it and apply lime-sulfur. Then I could finish wiring the tree. It was a constant strugle for time between repotting and wiring. Not to mention work and family. At some point I had to decide that I will not be able to detail wire the tree. My friend Carrie came by to help me repot my trees and also moss this tree. I think half the moss came from the driveway of my neighbor's across the street.
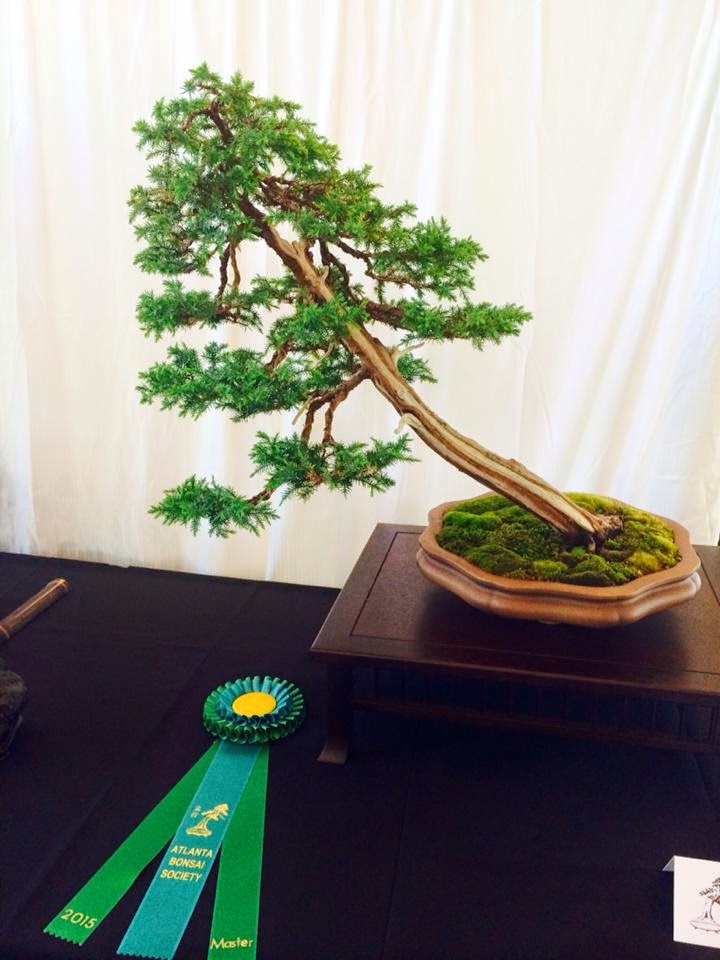
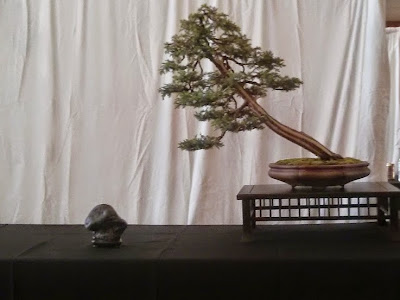 This is the final display. I ended up using one of my favorite stones - this is a natural hut stone. The daiza was made in Japan by Mr. Suzuki. I think the tree and the stone work well together. Kathy Shaner was our judge this year. We set up the trees on Friday night and I want back home. The plan was to come back for the public critique of the show the next morning.
 Surprise! The next morning I found out that my tree was given first place in the enthusiast category (for some reason it says "master" on the ribbon). The rules state that most of the work needs to be done by the owner, who cannot be a professional. That definitely applies to this tree since I literally applied every wire myself. Kathy was very nice in her critique and mentioned that she liked how the stand and the tree and the stone work together.
 The next day my family came to share in my special moments :).
Looking back at the last three and a half years I can see how much of my understanding of bonsai has changed. I was lucky enough to travel to Aichi-en 3 times and am getting ready for the next trip in May, which is when they work on needle junipers. I am hoping to get my hands on the true Tosho and learn how to cut and set pads. I was lucky to study with Peter Tea and Juan Andrade over those years and things are starting to make sense, but I am only starting to learn how much more I need to learn.
Below I posted the progression of this tree from October 2011 until March 2015.

This is the first picture I have from October 2011. The tree was very full when I saw it, but I did not take a picture and started to cut it and apply wire. In fact, I think this is the first tree I have ever wired. The next picture is from the same month.

This was my first time working on juniper foemina and I remember that after a few hours I noticed that my hands started to tingle from all the pricks. Those needles are pretty sharp and you need to be careful not to push against the needles, but to handle the foliage with the flow of the needles.

A few months after I wired the tree Ryan Neil came to visit our club and I brought the tree to his workshop. He had adjusted the angles of some of the branches and had me add heavier wire for main branches. Next is the picture from December 2011 after Ryan has set the branches.



Looking back at the last three and a half years I can see how much of my understanding of bonsai has changed. I was lucky enough to travel to Aichi-en 3 times and am getting ready for the next trip in May, which is when they work on needle junipers. I am hoping to get my hands on the true Tosho and learn how to cut and set pads. I was lucky to study with Peter Tea and Juan Andrade over those years and things are starting to make sense, but I am only starting to learn how much more I need to learn.
Subscribe to:
Posts (Atom)